

![]()

Built by SECURITECH is a one of the newest security systems introduced into the fire service in the past few years. Mainly seen on commercial buildings, however, they are growing with the prepping community and some residential homes. They are also being used more and more by Marijuana dispensaries. We have noticed these locking systems on doors in your Walgreens or CVS-style stores, located mainly on the C or D side of the building.
The system features multi-point locks for an exit door. Focusing on a 4-point locking system with stainless steel deadbolts; a stainless steel pry plate covers the main deadbolt and stainless steel thru-bolt plates.
SECURITECH offers two options for of locking mechanisms. The TEL-100 model is a manual locking system where a paddle on the interior has to be pulled for the system to lock. The TEL-200 model provides the same locking deadbolt protection but with a self re-locking system each time the door is closed. A pull handle is not installed on this door. A door closer is required for this style of self-locking system. Bolts on the exterior of the door near the top should indicate the door closer, but that may not always be the case. Some use of the framing square on panic style door latches may work if the pull paddle is installed. The TEL-100 system is the primary system that this technique will work on.
The system uses a standard 4-point locking system; three retractable bolts on the latch side and one bolt on the hinge side(non-retractable). Two additional locking points can also be added on the hinge side totaling six locking points. Locking bolts are free spinning to prevent a saw from cutting them. The bolts are made of stainless steel and are 5/8″ in diameter. The bolts could be set at different lengths into the door frame. This is depending on the installer and what is actually behind the frame i.e. backfilled with concrete, brick, or wood that the jamb is mounted to. The bolts are overall 7″ in length and installed high and low on the latch side of the door. The hinge side bolt is located in the center of the door near the jamb side. Other bolts could be placed high or low on the hinge side as well.
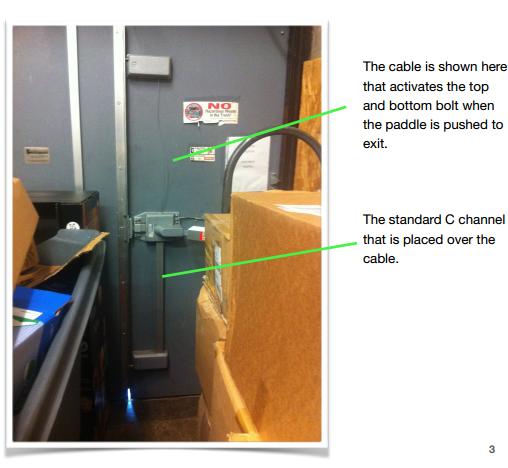
The Main Locking Mechanism
The main locking mechanism is located in the center of the door on the latch side. The latch is secured by six carriage bolts and a stainless steel cover that also extends over the jamb to prevent prying near the bolt. The “bolt” is actually a flat bar that is 1-1/4″ wide by 1/2″ thick and is connected to
the two other bolts above and below via a cable that is hidden in a piece of aluminum C-channel.

The door can be outfitted with an additional egress module that prevents thieves from being able to to grab and go out the door. This module is activated when the paddle is pushed to activate the door locks. It keeps the door locked for 15 seconds after the paddle is pushed. The paddle has to be held in the pushed position for the 15 seconds before the door will open. The module is usually placed above the locking mechanism on the very top of the door.


A side by side comparison to help show where or what is being locked on the inside. This door has a standard setup installed on it. There could be additional bolts on the hinge side of the door.
 The key to successful entry through this door is irons work with the GSF method. For the hinge lovers, the hinge side will be the least likely option to use due to a non-retracting deadbolt. Saw work will be difficult due to free spinning deadbolts and offset latches. Preplanning your first and second due area is going to be key when knowing what your up against. Due to the design and characteristics of the locking mechanisms, Command should be notified as soon as possible that entry will be delayed due to a fortified rear/side door. The firefighter will need to fall back on his or her training to be successful in gaining entry through this door. The standard placement of the irons may not work, however, knowing how to manipulate the tools, using the mechanical advantage and possibly using a roof hook for leverage, will get you through this door.
~East Coaster~
– Please note: The author of this article would like to remain anonymous.
This looks like a great tool for the tool box also…
http://www.vententersearch.com/framing-square-foricble-entry/
-Ryan